MOTOREX DYNCO Quick Guide
1. Preparation
1.1 Motorex DYNCO
- Select the correct ATF using the vehicle data in the MOTOREX Oilfinder and place it in the "NEW OIL" position in the device (filling quantity PLUS 4 litres reserve).
- Remove the waste oil canister from the device, empty and reposition it.
1.2 Vehicle preparation
- Heat ATF to operating temperature. Recommended after test drive.
- Position the vehicle on the lifting platform and place the selector lever in the parking position (P).
- Check or read the fluid level of the automatic transmission.
- After connecting the MOTOREX DYNCO to the vehicle battery, the display will briefly show the firmware version and serial number of the machine.
IMPORTANT: Always check the ATF level while the engine is running, taking into account the temperature of the fluid and the manufacturer's instructions.
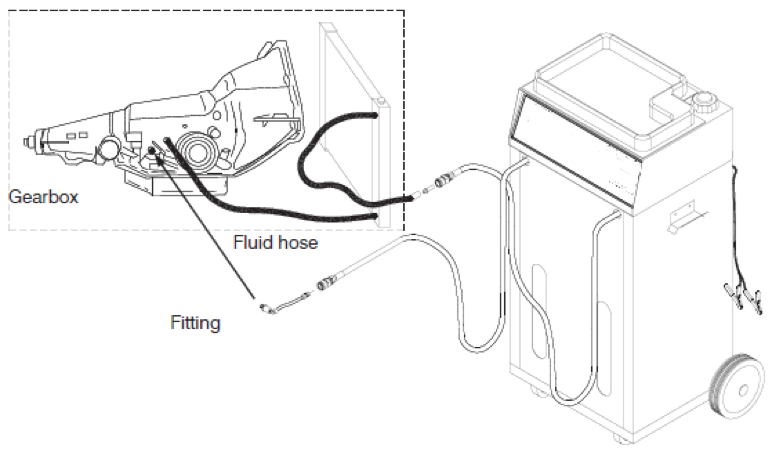
1.3 Connecting to the gearbox
- Depending on accessibility and connection type, disconnect the line from the automatic transmission connection or from the ATF cooler connection.
- Connect one of the two hoses of the MOTOREX DYNCO to the gearbox-side using the appropriate adapter. Connect the other MOTOREX DYNCO hose to the gearbox oil line
IMPORTANT: IMPORTANT: It is not necessary to know the flow direction of the oil, as the MOTOREX DYNCO will automatically detect it.

2. Use
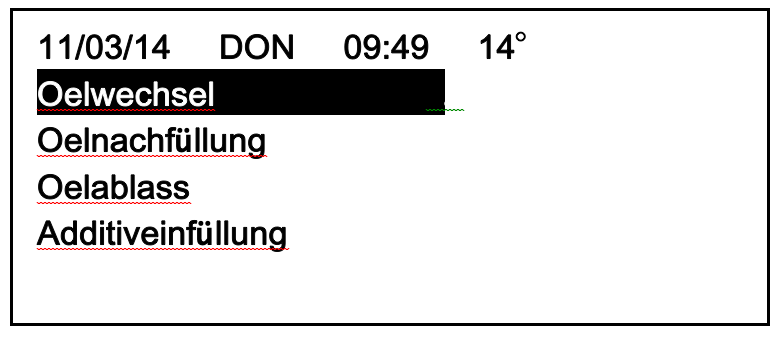
2.1 Start screen
- In the start screen, select the menu item by turning the jog button and confirm by pressing it.
- Scroll through the list of functions and press the JOG button to confirm the selected operating cycle.
- Enter the quantity of fluid to be changed by turning the jog button and confirm by pressing it. Follow the instructions on the display and, if necessary, confirm with the Jog button or ESC.
The running process is indicated by the continuous flashing of the green light.
IMPORTANT: Before starting the change cycle, the MOTOREX DYNCO will check the flow direction of the fluid for a short period of time (approx. one minute) and then start the process automatically.
When the change cycle of the set quantity has been completed, the green light stops flashing. The MOTOREX DYNCO will automatically change to "LOOP". This means that the connection between the gearbox and the ATF cooler is bridged and the pump is switched off. At the end of the cycle the green light remains on.
3. Printer
At the end of each operating cycle, the MOTOREX DYNCO prints a report containing all relevant data.
4. Fluid type
After the fluid type function has been selected with the jog button, press to display the fluid list. All MOTOREX products are already pre-programmed together with all relevant data.
4.1 Oil type change
If you use a new oil with different specifications, proceed as follows:
- Remove the used canister and position the canister with the new oil in the "NEW" compartment and reinsert the suction pipe.
- Select the OIL REFILL option and set the volume to 0.3L. Then connect a free end adapter to one of the two hoses of the MOTOREX DYNCO (e.g. the adapter with the long white hose) and pour the flushing oil into a container of your choice (this oil is then unusable).
- Press the Jog button.
Once the operation has been completed, repeat the process on the other MOTOREX DYNCO hose.
Now both the machine and the hoses are filled with the new type of oil and ready for a new process with the correct ATF.